


Products
- 18 PT Cards
-
32 PT Black Edge Cards

- Announcement Cards
- Bookmarks
- Brochures
-
Brown Kraft Cards
- Business Cards (14pt,16pt)
- Calendars
- Catalogs
- Counter Cards
- Door Hangers
- EDDM - Everydoor Direct Mail
- EDDM - FULL SERVICE
-
EndurACE - Waterproof
- Flyers / Sellsheets
-
Foil (Multi-Colored / Akuafoil)

- Foil Cards
-
Foil Cards (RAISED )
- Gift Card Holders
- Greeting Cards
- Hang Tags
- Letterheads / Envelopes
- Linen (Ecofriendly)
- Magnets
-
Natural Cards
-
Painted Edge Cards
-
Pearl Metallic Cards / Envelopes
- Plastic Cards - 20 PT
- Political Printing
- Postcards
- Presentation Folders
-
Raised Spot UV Cards
- Rip Cards/ Tear-off Cards
- Roll Labels
- Roll Labels (Custom Cut)
-
Silk Cards
- Stickers / Labels
-
Suede Cards
- Table Tents
- Trading Cards
Services
- DESIGN SERVICES
- BLOG
- Every Door Direct Mail
- Large Format Printing
- Sample Request
- File Review
- Custom Quote
- Wow Factor Effects
- FAQ
- Printing 101- Articles
- Testimonials
- About Us
- Contact Us
Track Your Order
Customer Login
BLEEDS / BORDERS
- WHAT ARE BLEEDS?
- SETTING BLEED IN PHOTOSHOP
- SETTING BLEED IN ILLUSTRATOR
- SETTING BLEED IN INDESIGN
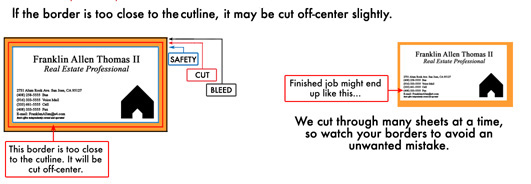
- PROBLEM WITH BORDERS
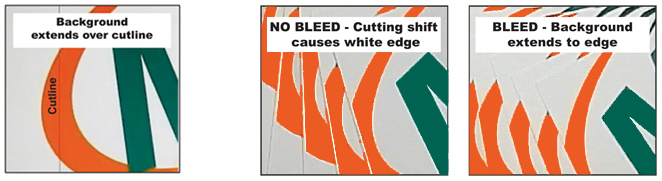
Bleed is a printing term that refers to printing that goes beyond the edge of the sheet after trimming. The bleed is the part on the side of a document that gives the printer a small amount of space to account for movement of the paper, and design inconsistencies. Bleed ensures that no unprinted edges occur in the final trimmed document.
It is very difficult to print exactly to the edge of a sheet of paper/card, to achieve this it is necessary to print a slightly larger area than is needed and then trim the paper/card down to the required finished size. Images, background images and fills which are intended to extend to the edge of the page must be extended beyond the trim line to give a bleed.
Bleeds are generally 1/8 of an inch from where the cut is to be made. This can vary from one print company to another. Some printers ask for specific sizes; most of these companies place the specific demands on their website or offer templates that are already set to their required bleed settings.
Bleeds are used to avoid strips of white paper showing on the edges of your print should the batch be misaligned when cut to size. Any objects in your artwork that touch the edges of the document require bleed, for instance a background colour or image should spread to cover the entire bleed area as should any objects that creep in from the side of the page.
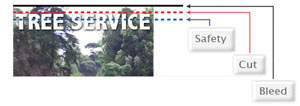
To avoid text being cut off, be sure to keep all text inside safety to avoid text being cut off. Keep text inside safety zone.
Example shown will have text cut off.
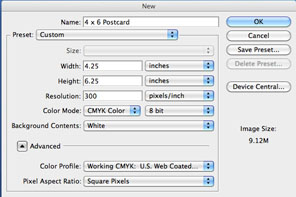
When creating your document, simply make the calculations to the artwork size as shown in example for 4 x 6 postcard. Add bleed to your document size and enter them into the Width and Height boxes.
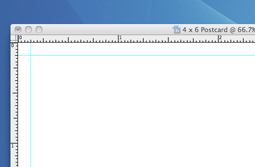
It is always useful to place in some guides to remind you where the trimmed document size lies. Drag guides to the borders of the normal document size allowing the 1/8 inch on all size to show by guides.
In Photoshop you alter the overall size of the document to accommodate bleed, however in Illustrator try and keep the document correct to the desired finish size.
Remember any objects spanning to the edge of the artboard will require bleed, run these out an extra .125 per side. Using a temporary rectangle or margins at the overall bleed size can help align the objects.
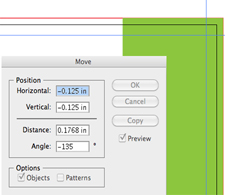
Drag margins and snap them to the artboard. Right click on the artboard and unlock the guides, select each guide in turn and press the Enter key to move it. Enter your desired margin figures into the X and Y boxes to move the guides into position.
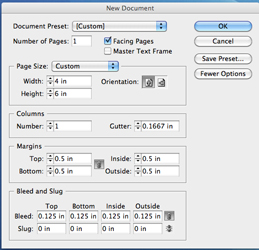
With InDesign being primarily a desktop publishing application it has the most options for setting up a document for print. Under the New Document menu you will notice individual options for Page Size, Margin and Bleed, simply enter in your figures and let InDesign setup the document for you!
Copyright Catalog Graphics/Color Printing Pros 2016