|
Top
CREATING HIGH RESOLUTION PDF FILES
WHY HIGH RESOLUTION PDF FILES ARE PREFERRED
* They are a "locked" file format, which can eliminate file variations due to platform, software or version issues.
* They are a compressed file format, which means smaller files and faster upload times.
* They are a single file format, which makes for faster and easier uploads (no need to upload fonts or links separately).
A PDF helps to insure that your job proceeds quickly, smoothly and with no unexpected "surprises."
"QUICK-START" PDF Instructions for Adobe applications (such as Illustrator, InDesign, Photoshop)
1. Save As... (Illustrator/Photoshop) or Export...(InDesign).
2. Select PDF as the format.
3. Set "Adobe PDF Preset" to Press Quality.
4. Set "Compatibility" to Acrobat 6 (PDF 1.5).
5. In the "Marks and Bleeds" section (InDesign and Illustrator only), set "Bleeds" to .125 inch on all sides.
6. In the "Output" section:
Set "Color Conversion" to Convert to Destination (Preserve Numbers).
Set "Destination" to U.S. Sheetfed Coated v2.
Set "Profile Inclusion Policy" to Don't Include Profiles.
7. Click Save PDF
You now have a "Press Ready" PDF ready to upload!
QUICK-START" PDF Instructions for Quark
1. PAGES- (if more than one page- mark: Export as Separate Pdfs)
2. COMPRESSION: Change all color Images to: RESOLUTION- subsample to 300 dpi
3. MARKS - Registration Marks Option should beon mode- Centered
4. BLEED - Options should be: Symmetric with .125 amount - Make sure "clip at Bleed edge" is NOT checked.
5. Click OK
6. Name your files.
7. Click Save and you now have a HIGH RESOLUTION PDF w/ cropmarks (our PREFERRED file).
YOUR FILES ARE NOW READY FOR UPLOADING....
For more information and to see some of the common errors, go to:
http://www.colorprintingpros.com/faq.php
Top
PREPARING FILES FOR PREPRESS FROM PHOTOSHOP in 6 Easy Steps
I. CREATE A NEW FILE
1. Create a document with the BLEED SIZE of your job, (i.e. 4x6 postcard = 4.25" x 6.25" file)
2. Select CMYK as Mode
II. MAKE YOUR FILE with This DOCUMENT SETUP
1. Make sure resolution is 300 pixels/inch.
III. SET YOUR BLEEDS AND GUIDES
1. Pull guides 1/8" INSIDE bleed for your trim. Your job will cut on these guides.
2. Pull another set of guides 1/8" INSIDE trim line, (or 1/4" inside bleed) for your SAFETY.
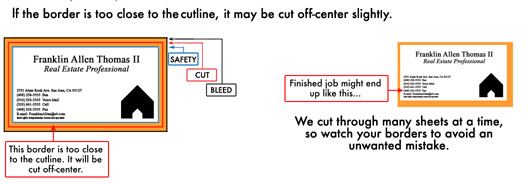
The area inside the box formed by these guides is the "SAFETY area". Do not place any type or critical design elements outside of the safety zone. The printing term BLEED is used to describe when ink prints to the edge of the page. If your job "bleeds", you must add 1/8", or .125", bleed on all four sides. This .125" will be trimmed off after the job is printed and cut down to final trim size. This is why you make your file size larger than the FINAL SIZE of your product. By making your image size larger, you have extended your background image to bleed so that the white of the paper will not show in the final cut. Be aware that text or images too close to the CUT LINE (shown in SOLID RED) will be cut off.
It is not recommended that you use a thin border around your job. If you are designing your file with a border around the edges, it must be a minimum of 1/4" wide, plus the 1/8" we need for bleed. Due to physical limitations of guillotine cutting, borders thinner than that will most likely appear uneven. We are not responsible for uneven borders if they are not at least 1/4" (.25") thick.
IV. IMAGES
1. All images must be in CMYK Color Mode - NO RGB images
Exception: if your images(s) are ONLY Black & White, DO NOT save them as CMYK. Save them in GRAYSCALE Mode.
2. All images should be 300 dpi resolution (or 1200 dpi resolution for B&W line art) at THE FINAL DIMENSIONS YOU INTEND TO USE THEM.
PLEASE NOTE:
Your resolution of images need to be 300dpi at THE FINAL DIMENSIONS YOU INTEND TO USE THEM. If you enlarge your image 200% after you bring it into Illustrator, your resolution is now half, or 150dpi. This resolution is considered low and should not be printed. Also, a low dpi image cannot become a 300dpi image by manually changing the resolution. IT MUST be rescanned.

V. COLORS
1. You must convert all colors to CMYK mode. That includes ALL fill colors, stroke colors and gradients.
2. Do not leave colors in RGB mode. There is big possibility of a color shift when converting from RGB to CMYK. Do not trust your monitor
3. If using a BLACK color- use a "RICH BLACK" (see illustration). DO NOT make regular text "rich" black. ONLY big headers, large black areas and elements heavy in black color should be rich black. ALL BLACK TYPE SHOULD BE 100% K. Do not make your type CYMK. Using 100% K for text will make your type sharper.

All colors used in your files must be created or converted to CMYK mode. DO NOT save your files in RGB mode. There usually is a color shift when converting from RGB to CMYK. IF your job is color critical, we highly recommend you order a "hard copy color proof". Do not trust the colors on your monitor unless your monitor has been calibrtaed to SWOP standards as well.
REMEMBER: There are Only four channels that should be in your Photoshop file - CYAN, MAGENTA, YELLOW, BLACK. Extra channels must be deleted to ensure your file outputs correctly. (Exception: Colored metallics or silver masks)
VI. MAKE FILE- SAVE AS:
After you have finished designing your file, we suggest you save a copy with all the layers as a PSD file on your desktop.
You should then:
1. Go to Layers and Flatten Image
2. Name your file and Save As: EPS or TIFF
EPS OPTIONS
1. Encoding must be BINARY!- NO JPEG Encoding !
2. Select Preview Macintosh (8 bits/pixel)
TIFF OPTIONS
1. Image Compression. DO NOT! compress your image using LZW Compression.
2. Select MAC or IBM Byte Order
IMPORTANT: TIFF & EPS versus JPEG All three are standard compressed file formats, which aid to minimize the size of data files, but with one main difference. JPEG, unlike TIFF & EPS, is a lossy compression, as information that it deems unnecessary is eliminated. The losses can be very slight, or large, depending upon the specific file and image quality settings picked by the user. We recommend not using jpg. However, for those preferring JPEG files,as long as they were created at 300dpi and saved as maximum quality, the losses are generally very slight and usually unnoticeable in the final printed piece.
Optional: You may want to use STUFFIT! or ZIPIT! to compress your files prior to sending. It will aid in file transfer time.
YOUR FILES ARE NOW READY FOR UPLOADING....
For more information and to see some of the common errors, go to:
http://www.colorprintingpros.com/faq.php
Top
PREPARING FILES FOR PREPRESS FROM QUARK in 6 Easy Steps
I. CREATE A NEW FILE
1. Create a document the TRIM SIZE of your job, (i.e. 4x6 postcard = 4" x 6" file)
2. Unlike Photoshop or Illustrator, in Quark ONLY, the document is created at the TRIM SIZE and NOT the BLEED SIZE.
II. MAKE GUIDES
1. Make guides 1/8" OUTSIDE each edge of the trim line for your bleed. Make sure to extend your background to this line which will be outside your document layout.
2. Make guides 1/8" INSIDE each edge of the trim line for your SAFETY.
III. SET YOUR BLEEDS AND GUIDES
1. Pull guides 1/8" INSIDE bleed for your trim. Your job will cut on these guides.
2. Pull another set of guides 1/8" INSIDE trim line, (or 1/4" inside bleed) for your SAFETY.
The area inside the box formed by these guides is the "SAFETY area". Do not place any type or critical design elements outside of the safety zone. The printing term BLEED is used to describe when ink prints to the edge of the page. If your job "bleeds", you must add 1/8", or .125", bleed on all four sides. This .125" will be trimmed off after the job is printed and cut down to final trim size. This is why we ask you to make your file size larger than your final size. Be aware that text or images too close to the CUT LINE (shown in SOLID RED) will be cut off. Make sure that your background image extends 1/8" past the TRIM LINE. In the above illustration, the background image needs to extend to the BLACK LINE. Be sure to extend the background image to bleed so that the white of the paper will not show in the final cut.
It is not recommended that you use a thin border around your job. If you are designing your file with a border around the edges, it must be a minimum of 1/4" wide, plus the 1/8" we need for bleed. Due to physical limitations of guillotine cutting, borders thinner than that will most likely appear uneven. We are not responsible for uneven borders if they are not at least 1/4" (.25") thick.
III. UTILITIES: USAGE - PICTURES
1. All images must be in CMYK Color Mode - NO RGB images
Exception: if your images(s) are ONLY Black & White, DO NOT save them as CMYK. Save them in GRAYSCALE Mode.
2. TIFF or EPS images ONLY (Do not send Jpegs, Picts, Gifs, etc).
3. Do not save TIFF files with "LZW Compression"
4. Save Photoshop EPS files with BINARY Encoding.
5. Confirm the status of all linked images before you submit your files. No image link status should display "MISSING" or "MODIFIED". All images should display a status of "OK". If images display either "missing" or "modified", update them by clicking "Update", browsing your desktop for them and then selecting them by clicking "OK".
6. All images should be 300 dpi resolution (or 1200 dpi resolution for B&W line art).
PLEASE NOTE:
Your resolution of images need to be 300dpi at THE FINAL DIMENSIONS YOU INTEND TO USE THEM. If you enlarge your image 200% after you bring it into Illustrator, your resolution is now half, or 150dpi. This resolution is considered low and should not be printed. Also, a low dpi image cannot become a 300dpi image by manually changing the resolution. IT MUST be rescanned.
V. CHECK YOUR COLORS
1. You must convert all colors to CMYK mode. DO NOT save your colors in RGB mode or PANTONE mode.
2. Do not leave colors in RGB mode. There is big possibility of a color shift when converting from RGB to CMYK. Do not trust your monitor
3. If using a BLACK color- use a "RICH BLACK" (see illustration). DO NOT make regular text "rich" black. ONLY big headers, large black areas and elements heavy in black color should be rich black. ALL BLACK TYPE SHOULD BE 100% K. Do not make your type CYMK. Using 100% K for text will make your type sharper.
DO NOT use Quark Xpress default BLUE . It will print Purple. (see illustration)
When using a blue in your design, always make sure to leave at least a 30% difference in your Cyan and Magenta values. Blue is close to purple in the CMYK spectrum. Remember, use a low amount of magenta whenever using high amounts of cyan to avoid purple.
Here is: C-100% M-100% Y-0% K-0%
On Screen

After Printing

5. Make sure all colors are CYMK and Spot color is NOT CHECKED.
IF your job is color critical, we highly recommend you order a "hard copy color proof". Do not trust the colors on your monitor unless your monitor has been calibrated to SWOP standards as well.
V. CHECK TYPE STYLES
1. DO NOT STYLIZE FONTS.
To bold text, use the actual font, ex "Helvetica Bold". DO NOT create bold text by using the type styles menu bar. Styles created in menu do not output well and your styles may not appear.
2. If you are not make a high resolution PDF from your Quark file, you need to collect all fonts. Double check you have included all the fonts you used. Make sure you are not missing a font.
VI. FILE- SAVE AS:
If you are not creating a high resolution PDF, you need to : COLLECT FOR OUTPUT.
You should then:
1. Put all pictures, fonts and Quark Files in a folder and Stuffit or Zip.
2. Fonts do not transfer well if not stuffed.
MAKING A HIGH RESOLUTION PDF:
1. PAGES- (if more than one page- mark: Export as Separate Pdfs)
2. COMPRESSION: Change all color Images to: RESOLUTION- subsample to 300 dpi
3. MARKS - Registration Marks Option should beon mode- Centered
4. BLEED - Options should be: Symmetric with .125 amount - Make sure "clip at Bleed edge" is NOT checked.
5. Click OK
6. Name your files.
7. Click Save and you now have a HIGH RESOLUTION PDF w/ cropmarks (our PREFERRED type of file).
YOUR FILES ARE NOW READY FOR UPLOADING....
For more information and to see some of the common errors, go to:
http://www.colorprintingpros.com/faq.php
Top
PREPARING FILES FOR PREPRESS FROM ILLUSTRATOR in 6 Easy Steps
I. CREATE A NEW FILE
1. Create a document with the BLEED SIZE of your job, (i.e. 4x6 postcard = 4.25" x 6.25" file)
2. Select CMYK as Mode
Make File with This Document Setup
Art Board should show document size with bleed size of your job, not the final trim size.
Printing & Export should be set at 2540 dpi
Rasterization Resolution 300 ppi - Flattening Settings: Vector balance 100
II. SET YOUR BLEEDS AND GUIDES
1. Art Board should show document size with BLEED SIZE of your job, not the final trim size.
2. Pull another set of guides 1/8" inside CUTLINE, (or 1/4" inside bleed) for your SAFETY. The area inside the box formed by these guides is the "safety area". Do not place any type or critical design elements outside of the safety zone.
The printing term BLEED is used to describe when ink prints to the edge of the page. If your job "bleeds", you must add 1/8", or .125", bleed on all four sides. This .125" will be trimmed off after the job is printed and cut down to final trim size. This is why you make your file size larger than the FINAL SIZE of your product. By making your image size larger, you have extended your background image to bleed so that the white of the paper will not show in the final cut. Be aware that text or images too close to the CUT LINE (shown in SOLID RED) will be cut off.
It is not recommended that you use a thin border around your job. If you are designing your file with a border around the edges, it must be a minimum of 1/4" wide, plus the 1/8" we need for bleed. Due to physical limitations of guillotine cutting, borders thinner than that will most likely appear uneven. We are not responsible for uneven borders if they are not at least 1/4" (.25" ) thick.
III. DOCUMENT INFO for LINKED IMAGES AND EMBEDDED IMAGES
There are two types of images with Illustrator files - Linked and Embedded.
In either case, ALL IMAGES must meet four criteria:
1. All images must be in CMYK Color Mode - NO RGB images
Exception: if your images(s) are ONLY Black & White, DO NOT save them as CMYK. Save them in GRAYSCALE Mode.
2. TIFF, EPS images ONLY (No PICT , JPEG or GIF files)
Important: Make sure that your TIFF images WERE NOT saved with "LZW Compression"
Also make sure that your EPS images WERE NOT saved with JPG Compression Encoding.
3. All images should be 300 dpi resolution (or 1200 dpi resolution for B&W line art).
4. No Extra Channels.
In Both LINKED IMAGES and EMBEDDED IMAGES-
make sure: Image Mode is CYMK, Channels 4 only and resolution 300 dpi.
PLEASE NOTE:
Your resolution of images need to be 300dpi at THE FINAL DIMENSIONS YOU INTEND TO USE THEM. If you enlarge your image 200% after you bring it into Illustrator, your resolution is now half, or 150dpi. This resolution is considered low and should not be printed. Also, a low dpi image cannot become a 300dpi image by manually changing the resolution. IT MUST be rescanned.
IV. COLORS
1. You must convert all Illustrator colors to CMYK mode. That includes ALL fill colors, stroke colors and gradients.
2. Do not leave colors in RGB mode. There is big possibility of a color shift when converting from RGB to CMYK. Do not trust your monitor for judging color.
3. If using a BLACK color- use a "RICH BLACK" (see illustration)
All colors used in your files must be created or converted to CMYK mode. DO NOT save your files in RGB mode. There usually is a color shift when converting from RGB to CMYK. If your job is color critical, we highly recommend you order a "hard copy color proof". Do not trust the colors on your monitor unless your monitor has been calibrtaed to SWOP standards as well.
V. CREATE OUTLINES FOR ALL TYPE
1. You MUST convert all fonts to outlines (vector art).
2. We DO NOT want you to send us your fonts.
3. By Selecting "ALL" and going to TYPE - CREATE OUTLINES, your fonts will not be needed.
All fonts now will be vector art.
VI. MAKE FILE- SAVE AS:
* Select Illustrator EPS for format.
EPS FORMAT OPTIONS :
1. Set Compatability to the latest version of Illustrator ( 10.0 preferably)
2. Check Include Document Thumbnails
3. DO NOT check Include Document Fonts
4. Check CMYK Postscript
5. Set Postcript to Level 2
6. Set preview to 8 bit Macintosh or 8 bit IBM PC (if working on a PC)
7. Click OK
8. Name your files "XXXX_front.eps" and "XXX_Back.eps" as an example. DO NOT save as a native Adobe Illustrator file!.
9. Click Save.
Optional: You may want to use STUFFIT! or ZIPIT! to compress your files prior to sending. It will aid in file transfer time.
YOUR FILES ARE NOW READY FOR UPLOADING....

For more information and to see some of the common errors, go to:
http://www.colorprintingpros.com/faq.php
Top
|


